"It's Not Just The Product, It's The Care..." Deaf Technology Manufacturer since April 1988
VP+ Step-by-step Installation Instructions
DEAFWORKS Tech Support is pleased to offer you an
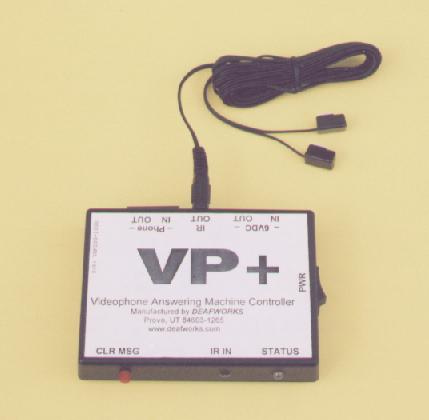
easy "step-by-step" installation instructions on the VP+, a Videophone Answering Machine
Controller unit (either color in black or white) which is a perfect gadget
gizmo item for every Sorenson's VP-100 or
D-LINK's DVC-1000 users! Here are several selection
steps:
VP+ unit requires a VCR (or DVD) to operate as an "answering machine". DEAFWORKS
strives for the best design to use the VP+ with your favorite VCR brands! But,
there may be one little problem. If you use a VCR alot for recording your various
TV shows, the VP+ will not work effectively. It would be best if you get another VCR,
just for videophone answering machine only. Again, the nicest thing about VP+ is that it
allows you to use freely with your own favorite VCR brands! What's more, if the
VCR breaks down under warranty, you do not need to return it by mail of where you got it
from. It would just a waste of money and time, too! You can just always run to your
favorite store locally to buy a VCR replacement unit. The VCR costs around $50.00
nowadays, pretty cheap! Look out in the newspaper for future store holiday sales which
it would gives you a deep discount for VCRs as low as $25.00!
Safety. Of course, it is everyone's mind. It is an extremely important that you keep your videophone's top side heat ventilation area
clear and free from any blockage. If you put something on top of it and block the ventilation, you are making the
videophone gets too hot! DEAFWORKS designed a VP+ that is so small which it
can sits on the videophone without any problem! For any reasons that your entertainment center shelf prevents you to
add the VP+ on top of the videophone unit, you can put it on the side of the videophone.
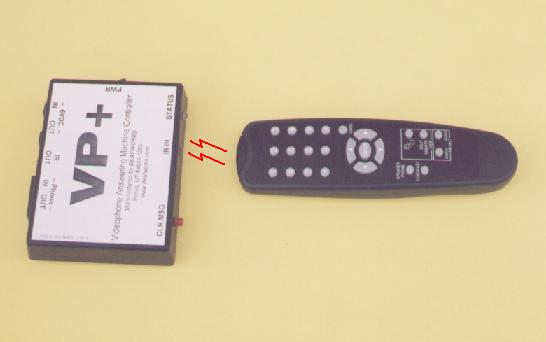
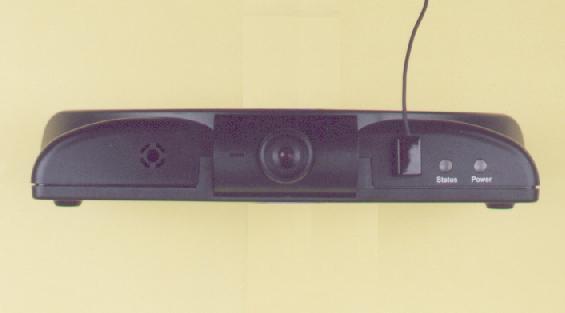
The VP+ unit is easy to learn from the remote control codes. Above picture is what you need to align between VP+
and remote control. To get VP+ to learn, do the following steps:
VP+ learns the VCR's remote control of REC & STOP:
On VP+, press and hold the red button for 3 sec.
Wait until the status LED light changes to steady red.
On VP+, release the red button.
Now, VP+ is ready to learn your VCR remote control codes.
On VCR remote control, press REC button
Wait until the VP+ status LED light changes to blinking red.
Now, VP+ has already learned your VCR remote control codes.
Wait for 1 second until the VP+ status LED light changes to steady red.
On VCR remote control, press REC button again.
VP+ verifies the REC button code by changing the LED light to blinking green.
Wait for 1 second until the VP+ status LED light changes to steady red.
On VCR remote control, press STOP button
Wait until the VP+ status LED light changes to blinking red.
Now, VP+ has already learned your VCR remote control codes.
Wait for 1 second until the VP+ status LED light changes to steady red.
On VCR remote control, press STOP button again.
VP+ verifies the STOP button code by changing the LED light to blinking green.
Wait for 1 second until the VP+ status LED light changes to steady green.
VP+ learns the VP's remote control of ENTER & CANCEL:
On VP+, press and hold the red button for 6 sec.
Wait until the status LED light changes to steady red.
On VP+, release the red button.
Now, VP+ is ready to learn your VP remote control codes.
On VCR remote control, press ENTER button
Wait until the VP+ status LED light changes to blinking red.
Now, VP+ has already learned your VP remote control codes.
Wait for 1 second until the VP+ status LED light changes to steady red.
On VCR remote control, press ENTER button again.
VP+ verifies the ENTER button code by changing the LED light to blinking green.
Wait for 1 second until the VP+ status LED light changes to steady red.
On VCR remote control, press CANCEL button
Wait until the VP+ status LED light changes to blinking red.
Now, VP+ has already learned your VCR remote control codes.
Wait for 1 second until the VP+ status LED light changes to steady red.
On VCR remote control, press CANCEL button again.
VP+ verifies the CANCEL button code by changing the LED light to blinking green.
Wait for 1 second until the VP+ status LED light changes to steady green.
Below pictures are what you need to set-up between VP+ and VP & VCR units. Do the following steps:
Click here to print out or view the installation drawing.
Connect IR connector to the VP+. (Click here to see it)
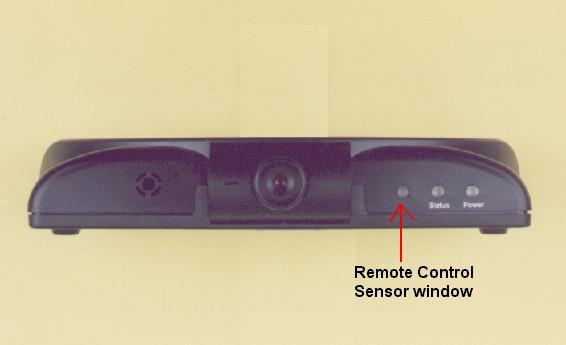
Wipe clean the VP's Remote Control Sensor window. (Click here to see it)
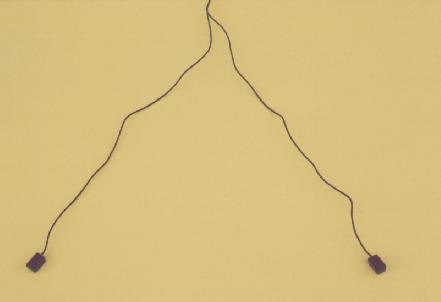
Spread out the IR connector. (Click here to see it)
Stick the IR on the VP in the upright position as exactly located. (Click here to see it)
Do the same thing for VCR. (Be sure to find its Remote Control Sensor window, too!)
To find VCR's Remote Control Sensor window, bring your VCR remote control very closely to the VCR and press PLAY & STOP several times to find its location.
It is just a tip feature. Like a TTY paper rolls, you keep record of conversation. Below procedure
steps are what you can do. Make it an useful out from your VCR:
Turn off the power on the VP+ to stop the answering machine in operation
On the VCR remote control, press REC button to record a converstation.
Make your call or answer the call via VP
Press STOP button to the VCR when you are done with it.
Jot down the tape length number memory on a notepad so that you can remember for the VCR to begin for the next incoming message(s).
Turn on the power on the VP+ to start the answering machine in operation.
![[DEAFWORKS fingerspelling]](/IMAGES/deaf.gif)
![[DEAFWORKS logo]](/IMAGES/deaflogo.gif)